Showing posts with label Crafts. Show all posts

Saturday, November 14, 2020

Diwali Lamp Craft

Happy Diwali! 

Today is the first day of Diwali, which is also known as the Festival of Lights in India and for many people around the world who celebrate this holiday. When I taught in Chicagoland, I had an Indian-American student whose mom came into our classroom to share their culture and holiday with us. 

One of my favorite activities we did with her was making these lamps called diyas. This is a fun and easy craft to make with your students! I made these with my kindergarteners. What I love about this craft is how beautiful and unique each diya turns out. 

Here's is how we made them at school. 
*I posted links for easy access to the supplies I bought. This post is in no way sponsored, endorsed, or administered by, or associated with Amazon or Michaels Craft Store.

Diya Craft

Materials:

  • 4 oz. plastic Mason Jars (Michael's has them in a 10 pack)
  • Mod podge
  • Tissue paper in various colors, cut into small .5 inch or 1 inch squares.
  • Battery-powered candle lights (I bought mine from Amazon)
  • Small paper plate or small cup or tray (to put Mod Podge on)
  • You can use paintbrushes but I find using your finger to be better.

Directions:

  1. Prep: Pour a little amount of Mod Podge on a paper plate, tray, or small cup. 
  2. Unscrew the tin lid and set it aside. I wrote the kid's names on the lid.
  3. Dab your finger into the Mod Podge and spread it around the jar and on the bottom of the jar. You can use a paintbrush but I found using your finger is better because it won't tear the tissue paper. *TIP: Hold the jar in one hand and use your other hand to spread the Mod Podge glue and put the tissues on the jar.
  4. Start putting pieces of tissue paper on the jar. Cover all the tiny spots.
  5. Then use the Mod Podge and spread it over the tissue paper. This will seal the tissue paper to the jar. Remind students they don't need a lot, just enough to cover the tissue paper because it starts to get soggy and clumpy if you use too much.
  6. Let it dry upside down. 
  7. Once it is dry, put the candle in it! And now you're done!

This simple craft turns out so cute and it is a fun keepsake for students to bring home. 


Thanks for stopping by! 

Thursday, February 6, 2014

Chinese New Year Recaps + A freebie

In my last post, I talked about my first Chinese New Year holiday without my family, living in China, and how we celebrated this awesome holiday at the international school I teach at.  Today I will share some of the crafts and activities we did to celebrate CNY.

In our ECC lobby, each student decorated a paper plate to add to our dragon body.  I love how it turned out.  Our principal and her husband (an art teacher) created and designed the head.  We got this idea from this site.
 We punched a hole at the top of the paper plates and used a paper clip to attach the plate to a wire string hanging on the ceiling.
I gave my students a bunch of different materials to decorate.  They could use markers, crayons, feathers, glitter, stickers, pipe cleaners, etc.  I let them use both glue and tape since the tape could hold the bulkier things down.


Since it is the Year of the Horse, we made CNY horse signs to hang up by our door.  The Chinese like to surround their door with good luck and well wish signs for the new year.  This always reminds me of the Bible account where people would paint their doors with blood during the Passover.
This craft was simple.  You can download the horse templates {here}.  Print the big octagon on red paper and the small octagon on white paper.  Add yarn or ribbon with some beads (I used yellow and red to match the Chinese color schemes) and glitter.  The Chinese character above the horse is called "ma" in Mandarin.


Another day we made a famous Chinese snack in our city and many others called Tanghulu.  Tanghulu are sugar candied fruits on bamboo skewers.  The most famous fruit the Chinese use are hawthorns.  But you can also use small oranges, strawberries, or kiwis.
Hawthorn berries are very tart and sour.  The candied sugar coating helps sweeten the fruit.  When biting into the Tanghulu,  sometimes the hawthorn is still sour causing your face to squish up.

Here's how to make this easy, yummy treat. First get 1 part sugar and 1 part water (I believe the TAs used about 1 cup of each ingredient) and let it sit and boil in the pan.  DO NOT STIR the mixture.  The mixture bubble up.  I think we waited about 10-15 minutes.
As you are letting it boil, start skewering the fruit.
 Then dip the skewered fruit into the pan and let the sugar harden.  The sugar should be hard like a lollipop.  It might take another 10 minutes to completely dry.  Use a Styrofoam ball or vase to stick the skewers in or the sugar will get stuck on the plates.
Tanghulu is typically sold on the streets as a snack.


Another famous Chinese snack we made were homemade dumplings or in Chinese it is called Gyoza.  Our kitchen staff made the meat filling and dumpling dough.  Then we had one of our ayi's (school helper) teach us how to roll, fill, and wrap a dumpling.  It is a lot harder than it looks.  
Here's a YouTube to show you how to do it.

Here are some pictures of my kindergarteners folding their own dumplings.  We boiled them and ate them when we were finished make them!


Link back and let me know if you tried making Tanghulu or dumplings at home or in school!  Many of my students (including some Chinese students) never had this before until we made it. 

I linked up with TBA's Freebie Friday!

Freebie Fridays

Sunday, November 10, 2013

Class Assembly

Last Friday, my Kindergarten class lead our Friday morning assembly.  Every Friday, in every school department (ECC, Elementary, Middle, and High school), we have assemblies where we sing worship songs and learn something that benefits the students.  Class assemblies is when a class shares what they have learned with the school.  Also, the parents can come in and watch them perform. 

I was so nervous because this was my first class assembly ever and I only had the change to see one example the week prior.  However, my students were wonderful!  My TA or I didn't have to pull anyone out of our performance for being too silly or disruptive.

We did a skit based on Moses' story.  Here is Moses talking with the burning bush with the rest of the class being sheep.  They were TOO cute!  We sang a couple Bible songs but their favorite was definitely Who's The King of the Jungle.
Since I had the parents coming in to watch the kids perform for class assembly, I changed my bulletin board to a Moses theme.
The Moses craft is of Moses in the basket.  Here is a link where I got the craft idea from (Love pinterest!) but I changed it up by adding a brad on the basket to open and close the basket.  I love how adorable this craft turned out to be.  The reed hands add a nice touch and dimension to it. 


Monday, July 29, 2013

Made It Monday- Dye-colored Clothespins!

This is my first Made-It Monday post!  After reading everyone's fabulous Made It Monday posts, I'm happy to finally join in on the fun!  I'm linked up with Tara from 4th Grade Frolics.
I've been spending the past 2 weeks gathering supplies, printing and laminating everything, and trying to pack everything in suitcases before I head out to China.  When am I leaving you ask? I'm patiently waiting for my visa to go through but I am hoping and praying that I will leave by the first week of August.

So I I found this idea on how to make colored clothespins from Buzzfeed. There wasn't any good tutorial I found, so I decided to test it out myself.
I went to Walmart to see what RIT dyes they had.  They sell liquid and powder versions.  I went with the liquid version because I wasn't sure how well the dye would stain the wood.  Each bottle was roughly around $2.80 each.  The colors I got were dark green, yellow, red, royal blue, and purple.  If you don't want to spend a lot of money, I would suggest getting the primary colors because you can mix them up to make other colors.
I also bought my clothespins from Walmart.  I found a 24 pack and bought 2.
Then I used plastic containers to mix the dye in.
***This is the important part when using the RIT dye, use about 2 cups of hot water.  I found out that cold water doesn't work well at all when staining wood.  To measure how much RIT dye to use I use the bottle cap.  I poured between 2-4 caps into the bowl.  With the darker colors I used about 2 caps.


I couldn't find any plastic silverware to stir the hot mixture so I used chopsticks (thank God for take-out Chinese food!).  I let the clothespins sit in the dye for about 5 minutes before I let them dry on styrofoam plates with a paper towel to soak the excess water.
And this is how they turned out!  The two green bags actually are different shades in person.  The bottom right is the actual dark green dye.  The green bag on the left is more of a brighter green.  I mix yellow and blue dye together.  I ended up making orange clothespins because I did not like the way the yellow turned out.  So I added a few drops of red to change the dye orange.
I loved how my colored clothespins turned out! I'm still debating on what I'm actually going to use the clothespin for in my classroom.  I'm thinking using some for my Behavior Clip Chart.

What do you use clothespins for in your classroom?  I need some more ideas!

Saturday, March 30, 2013

Easter Crafts

I know this is very last minute but I wanted to share with you the crafts I will be working on with my Sunday School Preschoolers tomorrow.  The story I am going to go over is when Jesus came to Jerusalem and people praised him and laid palm branches and coats on the ground in front of him.  (Matthew 21:1-11, 15-16; Mark 11:1-10)

Tomorrow on Easter Sunday, I was told I had to teach my class for a whole 2 hours because of the Easter service! I was sadden by this news since I was going to miss Easter service and the baptism.  So because of the extra hour, I needed to come up with more fun activities!

Since my lesson was focusing on Jesus entering Jerusalem, I was going to let the students role play the scene of laying down the palm branches and coats as he rode down the street on a donkey.
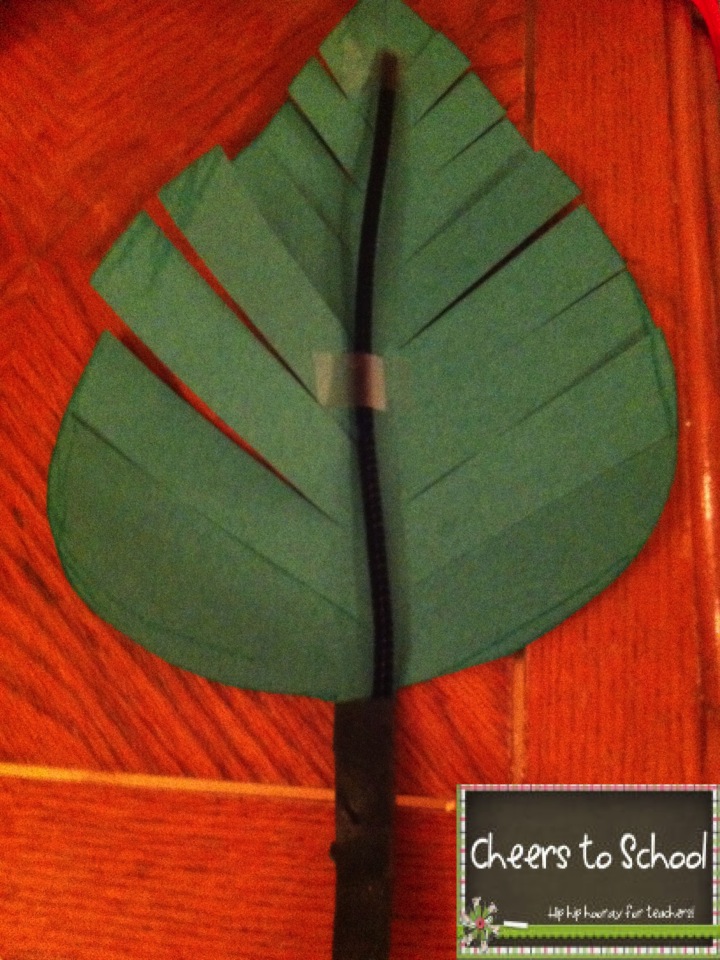
Here is the palm branch craft I came up with:
 Very cute right?

Palm Branch Craft:
What you need: green construction paper, scissors, green puffy paint, green glitter, flower tape, pipe cleaners, tape.

Here is a Palm Branch Template for those who want it.  I drew mine by hand.


Steps:
  1. Cut the template and add a piper cleaner in the middle of the palm branch.  I used tape because I ran out of elmer's glue at home.  You can use either since this is on the back for a sturdy support.
  2. Then use the flower tape to wrap the handle.
  3. Cut the diagonal lines.
  4. Use the green puffy paint to add lines on the palm branch. (Adults may need to help the younger ones)
  5. Put green glitter on the palm branches and shake onto paper plate.
  6. Then let it dry!

Jelly Bean Easter Craft
I used Kim Mitzo Thompson's Easter Jelly Bean Craft patterns and revised it for a different project for my preschoolers.  Check out her freebie above to download at the original craft.  Thanks Kim for the inspiration!

What you need: Jelly Bean pattern, crayons/markers, paper plates, scissors, yarn, glue, single hole puncher

Steps:
  1. Color the jelly beans and cut them out.
  2. Write a bible verse, poem, or whatever you like in the middle of the paper plate. 
  3. Glue on each of the jelly beans around the plate.  
  4. Punch a hole at the top and add string.
  5. Then hang it up!
Have a happy and blessed Easter everyone!

Thursday, February 7, 2013

Chinese New Year Lantern Craft (freebie)

Already one month down in the year 2013?  Wow, time does really go by fast...  With just 3 days until Chinese New Year starts (Feb. 10-24), a lot of people in the Asian communities are preparing for the biggest Asian holiday.

On the last day of this special holiday is the Lunar New Year.  It celebrates the first new moon of the new year.  On this day, people decorate their homes, the streets, stores and restaurants with beautiful, bright red lanterns.  The lanterns are typically decorated with pictures, designs, or words to bring good luck into the new year.

One of my favorite crafts is the Chinese New Year Lantern.

To make this craft, click here for the freebie or the picture below to get the instructions.  This craft is also included in my Chinese New Year Unit at  my TpT and TN stores.

Click {here} for another craft idea I posted about Chinese New Year-- Chinese fans.  They are fun and easy to make!